Some people may be intimated by the thought of repairing electrical wiring. But the following step by step procedure should help clarify matters a lot.
Required Tools and Materials
Soldering iron
Diagonal wire cutters
Heat shrink
Razor blade
Permanent marker
Eye goggles
Sponge
Alcohol (isopropyl)
Rosin core solder (8”)
Wire flux
Paintbrush
Fire extinguisher
Step 1
Be certain the shrink wrap is the right gauge for the wring. You can find this info on the wire sheath.
Step 2
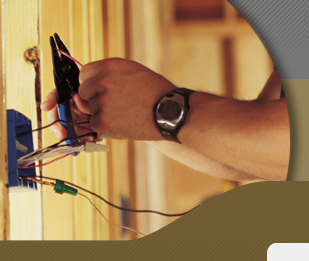
Turn off and unplug any appliances using the wire you’re about to fix. Shut down the circuit that goes through the wires. For frayed wires, slice it at the section you’re going to mend.
Step 3
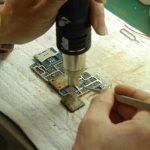
Begin the process of repairing electrical wiring by heating the soldering iron. Use the marker to mark a spot ½” from the spot you want to take off. Nick the sheath with the blade. Score it around the wire but it has to be done lightly.
Avoid cutting the wire. When you get to the repair section, flex it. When the sheath breaks, take it off. Repeat this procedure at the other end.
Step 4
Chop off a couple of inches of the heat shrink. Slide the piece at one side of the repair section until it goes past the unsheathed section.
Step 5
Don your safety goggles. Put the two unsheathed wires in the flux. Do it just enough to get some coating. When repairing electrical wiring, make sure nothing gets on the sheath.
Step 6
Dampen the sponge. Melt a layer of solder ¼” from the end of the soldering iron. Turn the soldering iron’s end to the sponge. Push the two sides together. They will engage. Smoothen it so no strings are left projecting.
Step 7
Set the soldering iron to the side of the meshed wire. Stop when it begins to smoke. For the other end, get some strand of solder. This will melt and coat the wiring. Keep repeating until the coat becomes a glossy silver.
Step 8
Use the paintbrush and alcohol to clean this area. Set the shrink wrap at the soldered repair. To continue repairing electrical wiring, warm it up with a blow dryer. Keep doing this until the ends are closed.
Step 9
Holding the fire extinguisher in hand, test the wire. Do not take off your safety glasses when testing.
Tips and Warnings
Do not put furniture or other objects on the wires. When setting up the wires, put them in a location where people cannot step on them. If the wiring works, have an inspector check to see if it meets the safety standards.
If the wring damage is extensive (i.e., five sections within a ft of the wire) then it’s better to just get a new one. Double check the wiring to make sure no appliances are running. Avoid inhaling the fumes when soldering.
Finally, always keep safety in mind when repairing electrical wiring. As long as you are careful, you should be able to fix it.