A broken faucet can swell up the water bill in the long run. It is always best to deal with the problem the soonest possible time. The good news is, it is possible to be fixing busted faucets with do-it-yourself procedures. Thus, here is how to repair a faucet in simple ways doable by ordinary people.
Tools Needed
Prepare two monkey wrenches (with gripping teeth) and a roll of Teflon tape. Also prepare a rubber washer in case the problem is a worn out washer. It is also advisable, when fixing busted faucets, to get a new faucet ready in case there’s no other option but to replace. Make certain these things are readied before going to the actual steps on how to repair a faucet.
First Step: The Main Shutoff Valve
Turn off the main shutoff valve first. The main water supply enters through this valve and into the pipes inside the property. This valve is often near the water meter. Otherwise, if available, just turn off the valve found directly under the sink. Fixing busted faucets need not waste lots of water. Just make sure the main tap is closed. After closing the valve, open the faucet to see if there’s still water running through the pipe connected to it. If the option is to cut off water supply by closing the main valve at the meter, see if the digital meter of dial is not moving. After ascertaining that water supply is cut off, start with the second step on how to repair a faucet.
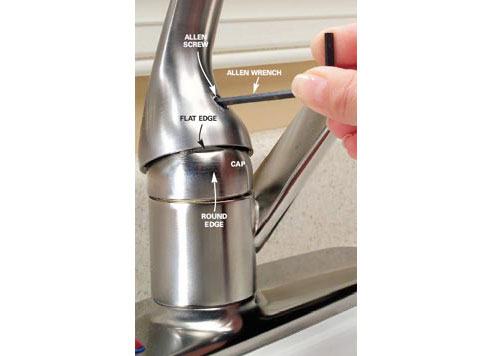
Second step: Check and Repair
Detach the faucet handle by loosening the screw on top. Then, detach the faucet valve itself by taking out the threaded spindle. Turn counter clockwise. When the threaded spindle is out, see if the black and round rubber washer inside is intact or busted. If busted, just remove it and put a new one. Then place back the faucet valve and screw it on top. To check, just open and close the faucet handle. When open or close there should be no water leak other than the gush through the main spout when the faucet is open. This is the easy do-it-yourself manner of how to repair a faucet.
Replacing a Faucet
However, in some cases, the faucet will still leak. If it does, this means the faucet set itself needs replacement. Then fixing busted faucets will have to take the more complex method. This time, two monkey wrenches are needed. These wrenches have adjustable and jagged grips; the jagged grip holds pipes that need to be steadied in place. So, detach the faucet set from the connecting pipe. One wrench should hold the wall pipe firmly and steadily, making sure it does not twist; the other should be used to rotate the faucet and loosen it in a counter clockwise motion.
After detaching the faucet set, carefully wrap the thread of the wall pipe with Teflon tape. Do it at least 6 to 7 rounds to prevent leaks—but not too much as to make it impossible to fit a new faucet on. Make sure to stretch it some while wrapping around. Then, put the new faucet set onto the threaded pipe. Carefully and gradually attach the faucet onto the wrapped threaded tube, rotating it evenly to shut the circumference tight. Do this with one wrench carefully turning the faucet to fit the threaded pipe, while the other holding the wall pipe steadily.