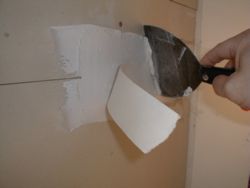
Over time it’s possible that cracks will appear in the  drywall. If that happens, you can use these techniques to repair drywall seams.
Required Tools and Materials
Scraper
Drywall tape and mud
Taping knife
Pan
Water
Note: look for all the seams first so you only have to get supplies once.
Step 1
Take off the drywall finish over the tape. Try to extend a little beyond it. If necessary, get rid of the finish with the scraper.
Step 2
Get your utility knife and remove the drywall tape. Use the same knife to cut off a new drywall section. Set it in place.
Step 3
Add some mud to the pan. Add just enough water so it thins a little. You can start to repair drywall seams by putting this substance on the taping knife with the seam. Put as much mud as needed to stick the tape onto the wall. Flatten the tape.
Step 4
Prepare some more mud. Use this to put in the drywall texture. Ensure it matches with the wall. Let it dry. Paint it.
Fixing Drywall Seams on Latex Paint
If the drywall seam is set on latex, you can use the following procedure.
Required Tools and Materials
Drywall tape
Drywall joint compound
Terry cloth rag
Sanding pole
Drop cloth
Drywall mud
Drywall mud pan
Drywall mud knife
Sandpaper
Step 1
Before you start to repair drywall seams, set aside all the furniture. Put the drop cloth on the floor.
Step 2
Get the sandpaper and apply it on the joint. If there’s dust, use the terry cloth rag to get rid of it.
Step 3
Take the mud pan and the mud knife. Put some joint compound along the drywall joint. Make it thick so the tape will set in. Get the drywall knife and use it to push the drywall tape into the joint. Be certain the joint is in the middle of the tape.
Step 4
Put in joint compound strip on the drywall tape. When you repair drywall seams, this needs to extend a few inches more than the damaged area. This layer should not be thick. Just put enough that the joint tape is no longer visible. Add more layers until the look you want is there.
Step 5
Apply the sandpaper on the mud when it has dried. Take out any rough spots you see. Get a clean rag and remove any traces of dirt there.
Step 6
Apply a second layer of drywall mud, again extending it by inches on all sides. Let it dry. Sand this layer. Feather the corners if necessary. Pass your hand over the wall. If there are any more rough spots, apply another mud coating and repeat the process. If it’s smooth, you can paint the wall.
Tips and Warnings
Do not expect to get a smooth look after adding one mud layer. Be patient and keep repeating the process.
It’s easy to call a professional and repair drywall seams. But there’s really no need as you can do it yourself.


