Drywalls are very nice to look at especially when they are free from any damages. It is available in various types, some of the most popular of which are cement board, soundproof drywall and lead-lined drywall. No matter how durable and flexible these materials are, it is still very much possible for them to acquire damage from screws and popped nails. In order to solve such problems, it is quite good to know how to repair popped nails in drywall.
Materials Needed
Before you can start with this moderately easy task, you need to prepare a number of important materials like a drywall-setting compound, a nail set and a hammer. In addition, be sure to prepare a primer, matching wall paint as well as a putty knife. Of course, you also need a couple of paintbrushes and sandpaper.
Steps
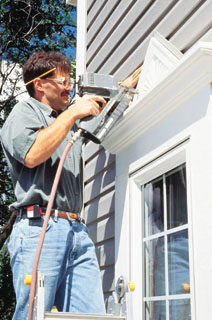
Try to remove the paint surrounding the damaged part of the drywall, specifically the bulging part. In case you cannot do this using your bare hands, try to use the putty knife instead. Next thing to do is to find the head of the nail that causes the wall to bulge. Get the hammer and then pound the nail in until it is about 1/8 of an inch back in place. In case a screw causes the problem, do not use a hammer because it can cause further damage to the wall. Use a screwdriver instead, which is the more appropriate tool.
Combine a small amount of water with the drywall-setting compound. It is best to read the instructions found right at the back of the package to achieve the best results. In case you need something faster, you can always go for the pre-mixed drywall compound. However, experts say that the powder form is more efficient and longer lasting than the pre-mix version.
After mixing, go back to the head of the nail and then apply a significant amount of it in the surrounding areas. Use the putty knife to apply the mixture instead of your bare hands. Likewise, use it to smooth out the edges. Wait for it to dry completely. Get the sandpaper and then smooth out the wall once again, especially the rough and uneven edges created by the drywall-setting compound.
Get the paintbrush and then apply a thin coat of primer on the wall. Let it dry and then apply another coat until the head of the nail is no longer visible. Once the primer is dry, get the matching paint and then apply a single coat first. Allow it to dry. In case the first coat is not enough, apply another one and then let it dry once again.