Learning how to make paper mache masks is a fun way of exercising one’s creativity. This is also ideal in making masks for Halloween or just for crafting a cool-looking decorative piece for the home.
To make paper mache masks, one would need a newspaper, paper mache paste, acrylic paint, a paintbrush, and either an aluminum foil or a round balloon. Before getting started, one should realize that this will be rather messy work. One should make sure that the work area is well-covered, perhaps with either an old tablecloth or a shower curtain, or even with some newspaper placed over wax paper.
Paper mache paste can be made by mixing 1 part of flour with 5 parts of water. The mixture is boiled and then simmered for 3 minutes. 1-2 tablespoons of salt is added to avoid molding. The resulting mixture should have a thick, glue-like consistency. It is then allowed to cool before placing it in a plastic container.
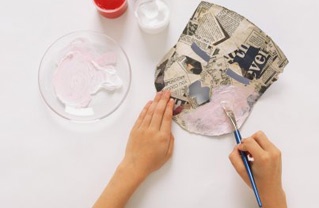
One can make paper mache masks by using either someone’s face or a balloon as a mold. If one opts to use a face, this is done by first taking a piece of aluminum foil that is at least two times as long as the face of the subject. It is folded in half and then pressed over the face. The newspaper is torn into several strips (around 1-2 inches wide and 4-8 inches long) and dipped one strip at a time into a bowl of paper mache paste, then holding each strip over the bowl and running it through one’s fingers in order to squeeze off the excess paste. The strips are then placed inside the foil mold’s curved section, covering it with at least 4 to 5 paper mache layers, but one should be careful that they do not press too hard so that the mold does not lose its shape. Also, a layer of paper mache should be allowed to dry first before putting in the next layer.
If one decides to make paper mache masks using a balloon mold, one must put the balloon (which has been inflated) on a cup or bowl to keep it in place. The bowl or cup is covered completely in plastic wrap to keep the paper mache from sticking to it. The balloon is then covered with strips of torn newspaper (same size as before); one can cover only half the balloon, or they can cover it completely if they intend to make a mold for a whole head. After one layer of paper mache has been completed and dried, facial features (such as eye brows, ears, a nose, lips, and so on) are added onto the balloon using any material such as cardboard, more newspaper, etc. These are held in place using masking tape, and once this is done, 3 to 4 additional paper mache layers are applied. To remove the mask from the balloon mold after drying, simply pop the balloon.
The paper mache mask can be made either as an ornament or to be able to wear; for the latter, the holes for the eyes and for the string to tie the mask around the head should be cut after drying and before decoration. Using acrylic paint, the mask can be decorated in any design that one wishes. One may also use other materials such as glitters, beads, pieces of fabric or whatever to give the mask some additional creative touches.