Once upon a time, the laser was merely a figment of science fiction. Today, however, they are an important component of many current everyday technologies, such as in CD and DVD players. They are so commonplace these days that, in fact, one can even learn how to build a laser of their very own.
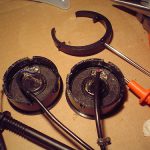
The first step in building a laser is taking a Triple-A battery holder and pressing its positive and negative leads against the matching points on a power switch. A soldering wire is then pressed to the leads, and the solder is melted into position with the use of a soldering iron. A 100 ohm POT is next soldered to a 16X Laser Diode, which has 3 points on its back arranged in a triangular pattern. The POT will be connected to the diode’s outside or top point. This is done in order to assist in regulating the electricity’s flow through the diode so that an actual laser is created instead of a constant LED (light emitting diode).
2 lengths of sheathed copper wiring are connected and soldered to the contact points that remain. The wires other ends are soldered to the other 2 points behind the diode. The POT’s side should have a screw on it which would serve to alter the resistance created by it. Set the screw in using a screwdriver so that the maximum resistance will be put out. 2 Triple-A batteries are inserted into the battery holder, and the device is then turned on. Keep an eye on the diode and then lower the POT’s level of resistance slowly, stopping once the diode reaches its brightest. The device is then turned off.
The diode is slipped in the Axis Module’s top half. Somewhat resembling a flashlight’s head, the module is a cylinder made of metal which contains several focusing lenses. The hardest part in building a laser is focusing it properly, and it would be a tad complicated to accomplish without a Physics degree, an expertise in Optics and a fully-operational optics lab. In this case, it is recommended to use commercially-manufactured lenses.
The diode is seated inside the Axis module at a particular distance away from the lens so that the laser created is merely a harmless light pointer. Otherwise, placing the diode too close to the lens would create a laser that can burn skin, melt plastic and set paper and wood on fire. Determine the type of laser one would wish to make. Then, a little soldering is applied to the diode’s back where it is touching the module’s interior so that the device is held in place.
The entire device is fitted into a cardboard tube (like one from a roll of toilet paper or paper towels), firmly taping it into place with the module’s front peeking out from the tube. The tube should be cut short enough so that the switch is protruding out from the rear. Finally, the switch is taped in place, and one has successfully built their very own homemade laser. Remember to avoid pointing the laser at living flesh or eyes, whether it is at people or animals. Even if one has built a relatively harmless laser, there is still a risk of causing damage, especially to the eyes.