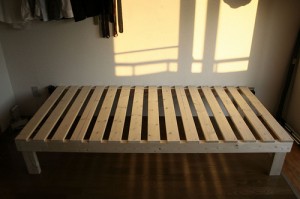
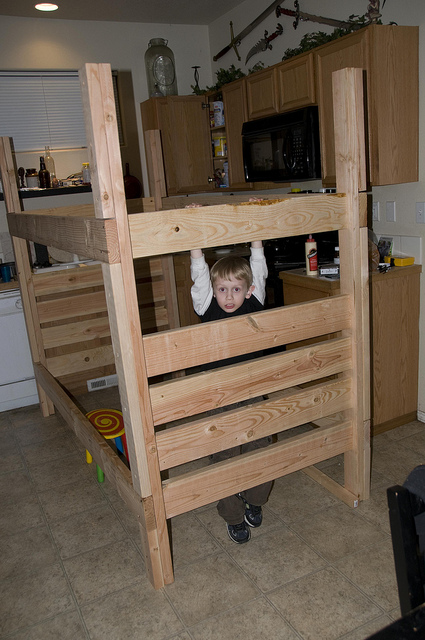
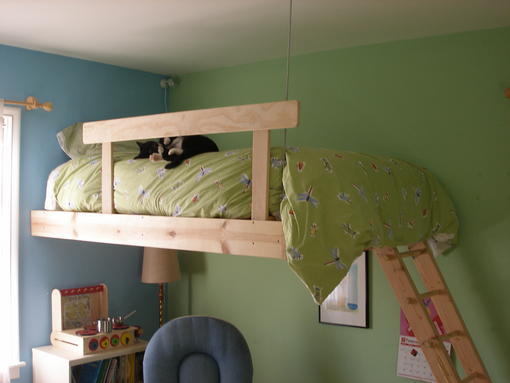
Posts Tagged ‘furniture’

How to Fix Bamboo Furniture

Sunday, January 3rd, 2010

It isn’t uncommon to expect bamboo furniture to require Fix Bamboo Furnituresome maintenance from time to time. You can usually find these kinds of furniture in porches and patios thus exposing them to the elements. Most of the things you need to do in order to fix bamboo furniture won’t be that expensive. You don’t need to hire a professional for most of the common damage you’ll find and you can do a lot of the needed repairs yourself.

Maintenance Tools

You don’t need to use any fancy tool to get the job done. You only need a few things to fix bamboo furniture. Just be careful when handling materials like lacquer, varnish, and paint. They are an integral part of your maintenance kit but make sure you don’t spill them on other pieces of furniture.

Other tools and materials you’ll need will include trimming sheers, sandpaper, and replacement bamboo parts or strands. You should also have mineral oil or, if you want, some linseed oil, ready. You will also need some water for any repair job you might find necessary.

Steps to Fix Bamboo Furniture

The first step to fix bamboo furniture is to assess the damage you have at hand. You should check if you need to make really big repairs or if all you need to work on are simple scratches. Plan ahead as to how you are to repair every piece of damage.

Most problems you can find plaguing bamboo furniture are easy enough to repair without a lot of hassle. Simple repairs include cracks and scratches, which can be fixed in minutes. However, if upon inspection you find that the damage is too huge, like a broken frame, then you will need some professional help. Don’t attempt to repair such huge problems as you might do more harm rather than get it fixed.

For scratches, the first thing you’ll need to fix bamboo furniture is sandpaper. The first step is to sand off any traces of the old varnish or paint. Smoothen out the area where the scratch is located. Next you’ll need to apply a layer of lacquer or paint to the sanded area. When the paint has dried apply an even coat of varnish if your bamboo furniture has that kind of finish.

If the section you’re working on will require some replacement then get your bamboo strands ready. Cut off the damaged strands using your trimming sheers. After that cut off an equal length of replacement strands. If the replacement strands are a little too stiff then coat them with mineral oil. Coating it with mineral or linseed oil will make the new bamboo more pliable. Use wood glue or any adhesive of the same quality.

Here are the finishing touches to fix bamboo furniture. Let the replacement piece dry off and adhere to the furniture. Coat with a fresh layer of varnish and leave it to dry. Once the varnish dries, put the furniture back to its original spot.

How to Repair an Office Chair

Friday, January 1st, 2010

The gas cylinder is the component that allows the chair to adjust its height. Repair an Office ChairRather than repair office chairs with defective gas cylinders, it?s easier to just get a replacement.

Replacing the Office Chair Gas Cylinder

Required Tools and Materials

Swivel desk chair
Pipe wrench
Gas cylinder replacement

Step 1

Clear the work area and position the chair horizontally. Loosen the clips on the wheeled base. Some chairs make use of nuts and bolts instead of clips. In that case, use the wrench. Remove any screws.

Step 2

Look at the chair column?s insides and make sure nothing else is damaged. If the pads or other components are tattered, replace them now.

Step 3

To repair office chairs and the gas cylinder, begin by putting the pipe wrench on the cylinder. Twist and pull the wrench. Keep doing this until the cylinder is removed. Usually you can turn the wrench in any direction.

Step 4

Install the new gas cylinder with the tapered part going into the column. You either rotate the taper or press a ?release? button to fit it in. Examine the chair to see how it works.

Step 5

Reconnect the chair?s base on the column. Test the chair by making adjustments to the height.

Notes on the Gas Cylinder

The gas cylinder model you choose must be the exact match for your chair. If you are going to repair office chairs, follow the gas cylinder?s instructions. It may have additional steps and procedures unique to the product. When dismantling the chair, keep all the nuts and bolts in one location.

Replacing the Seat Mechanism of an Office Chair

If you need to get new seat mechanisms, you need to prepare these tools.

Required Tools and Materials

Hammer
Screwdriver (flathead)

Step 1

Set the chair upside down. Lift the base from the pneumatic cylinder.

Step 2

Using the screwdriver, remove the screws on the seat mechanism. In most office chairs, this would be the black steel plate below the chair?s seat. Pull the cylinder as you hammer the mechanism. You can also replace and repair office chairs? seat mechanisms by hitting the cylinder on its sides.

Step 3

Put in the new seat mechanism. Put the cylinder in the opening. This would be in the midst of the mechanism. The plastic tab should be oriented to the seat.

Step 4

Put the base on the cylinder. Put the chair back up.

Tips and Warnings

Do not disassemble the chair if you don?t think you can put it back together again. You should never force a screwdriver or wrench that isn?t fit for the nuts / screws. Forcing it might damage the chair. If the chair is still under warranty, have customer service check it out. Put only moderate pressure when you use a hammer or mallet. These tools may cause damage if applied with too much force.
 
Most of the time it?s quite easy to repair office chairs. As long as you?re handy with wrenches, replacing its parts won?t be an issue.

How to Maintain Glass Dining Tables

Thursday, December 31st, 2009

Many homeowners have glass dining tables Maintain Glass Dining Tablesbecause these are very elegant and the tables make their homes more attractive. If you use the tables properly, you can see that these furnishings can last for a lifetime. Maintaining this type of table is difficult but if you have the necessary cleaning materials at home, these can ease the load. To know how to maintain glass dining tables appropriately just follow the simple steps below.

Procedures

When you have a glass dining table at home, always remember to use coasters and mats for your plates and glasses. The mats and coasters can prevent scratches on the glass. To make the table more captivating to the eyes of your guests, it is best that you use colorful coasters and mats.

If you are serving hot dishes or appetizers like soups, do not forget to use trivets. Hot dishes and soups can cause damages on the table. When cleaning the table, always use sponge and tap water. If there are stains on the table, you can remove it using detergents. To remove stains on the glass, it is best that you use high quality glass cleaner.

If there are scratches on the glass, you can remove these with the use of a buffing wheel. However, if the scratches are large and visible, it is important that you ask assistance from professionals. Whenever you have a hard time removing small chip of food on the table, you can remove it using emery paper to prevent having scratches.

Cleaning Glass Dining Tables

There are lots of things to consider before cleaning glass dining tables. Always remember that using cleaners with acidic substances as well as vinegar can cause permanent damages on the table. Below are the procedures that you can follow if you want to clean the table successfully.

Get a lint-free cloth, a cup of tap water, hot soapy water, a shaving brush, a cup of alcohol, a tablespoon of vinegar, a multi-surface spray and Petroleum Jelly wipes. Wash the cloth with the soapy water. Wash the bottom and top of the glass with the cloth. Wash the cloth with tap water and use it to rinse the glass. Get a dry cloth and wipe the top and bottom of the glass.

Get the Petroleum Jelly wipes and use these to clean the frame of the table. If you do not have the wipes, mix the alcohol, vinegar and a cup of water. Use this solution to clean the frame. Wipe the frame with dry cloth.

How To Repair a Treadmill

Wednesday, December 30th, 2009

The treadmill has become a popular indoor exercise Repair a Treadmillapparatus for people who are somehow unable to engage in an outdoor workout. But while its users are keeping fit, the machine itself can wear out due to constant use. It seems that one would need to know how to repair a treadmill in order to keep healthy.

Once a treadmill?s warranty period has expired, they typically require constant repair and renovation in order to keep them in good working condition. This is most especially true in the case of poor quality treadmills, and anyone who owns one would certainly much rather avoid the cost of getting it fixed regularly over just having it replaced. One would perhaps be much more motivated in spending for repairs if their machine is of a much higher quality model. The frequent maintenance of the treadmill is the inevitable price that one would have to pay to keep physically fit. But if one cannot afford the time to get it fixed outside, one would have to learn how to repair a treadmill at home.

When repairing a treadmill, it is important to bear in mind its most essential components. These are its motor, its belt, its deck and its display screen. The motor is actually the treadmill?s most vital part, so this is where the repairs should begin. It is absolutely necessary to clean the motor regularly in order to keep it free from dust. After this, one must always keep tabs on the condition of the belt. If one thinks that the belt is not working as well as it should or if it is somehow hard on the feet, one might consider replacing it. The chain which is supporting the belt should also be greased frequently to give it longer life.

The longer that a treadmill is used, the belt gradually loses its balance with the passage of time. Eventually, they won?t remain in the center and will have a tendency to skew either to the right or to the left. It is important for a treadmill to maintain its balance, and this problem can easily be remedied by using a screwdriver to screw the belt in place. One should also remember to inspect and lubricate the deck constantly.

When a machine starts making noises, this is usually a sign that something is seriously wrong with it. This case similarly applies to a treadmill. If it constantly makes noises the more that it is used, this would indicate that it may be time to overhaul its motor. But in getting the motor replaced, one should take into account whether the new motor would be compatible with the model that they are using. Aside from this, one may also have to replace the belt and the display screen as well. There are many treadmill manufacturers that offer replacement parts, so having such offers would spare one from serious repair costs.

?No pain, no gain,? as that old fitness adage goes. And it would appear that the constant pain of getting a broken-down treadmill fixed might become a part of one?s long-term exercise routine if they are not careful. But learning how to repair a treadmill doesn?t have to be too much of a workout. One might say it can be as easy as taking a jog in the park.

How to Repair a Lazyboy Chair

Monday, December 28th, 2009

Though lazyboy chairs are designed to last for Repair a Lazyboy Chairyears even if they are use frequently, there will still come a time that these comfy chairs will ask for some needed repairs. Paying immediate attention to a lazyboy chair that shows some problems will definitely save it from total damage and additional costs for repairs. Here are some ways that you can do to repair a lazyboy chair.

Product Warranty

Purchasing brand new lazyboy chairs are accompanied with product warranties. Most lazyboy chairs have lifetime warranty but are limited to specific mechanisms and parts. There is also a product warranty for the majority of the parts for a minimum of one year that covers the service and repairs. Then you can repair a lazyboy chair for free by availing of the product warranty if the damages were not caused by handling, transport, or improper use.

Dealer’s Assistance

When your lazyboy chair got broken after the expiration of the product warranty, you can always ask from your dealer for some assistance on the repairs. Dealers can point you to the authorized service centers in your local area to help you repair a lazyboy chair. If ever you cannot contact your dealer then go online and use the web to search for authorized dealers from your place that can assist you in the repairs.

Local Repairman

With the expiration of your product warranty it means that you have to shoulder all the needed expenses to repair a lazyboy chair. Availing of the expertise of the local repairman in your area is a good option since they will definitely ask for lower repair fees in comparison to service centers. Just make sure that your local repairman has satisfactory skills in dealing with lazyboy chairs. He can also instruct you where to find the right replacement parts for your valuable comfy chair.

Seek for Recommendations

Since lazyboy chairs are pretty popular and in demand then surely there would be several people in your neighborhood that owns one at their home. You can inquire them for some recommendations on what’s the best thing to do to repair a lazyboy chair. They can also tell you where to find the best service center and what should you expect when your lazyboy chair gets repaired.

Consult the Manual

There are some easy problems of lazyboy chairs that you can repair yourself. You need to consult the manual of the product and check for ways to take care and maintain your lazyboy chair. But bear in mind that you must not try to repair a lazyboy chair on your own if the damage needs some professional expertise to get repaired. Or else, the consequence will be more damages and more expenses.

How to Fix Aluminum Patio Furniture

Saturday, December 26th, 2009

Below are some tips on how to fix aluminum patio furniture. Fix Aluminum Patio FurniturePainting instructions are also provided in case you want to give it a new finish.

Fixing Chipped Aluminum Patio Furniture

Required Tools and Materials

Wire brush
Scrub brush
Cleanser
Superglue
Spatula
Fine wire mesh
Bondo
Mask
Latex gloves
Soapy water
Rough and fine sandpaper
Spray paint
Degreaser

Step 1

Clean the furniture with soapy water and the scrub brush. Scrub vigorously on the damaged parts. If the dirt is excessive, use a degreaser.

Step 2

Use the wire brush to remove the rust and paint all over the affected areas. Make sure that all the dirt and dust has been thoroughly removed.

Step 3

To fix aluminum patio furniture, you need to put the wire mesh on the rear of the patio furniture. Apply as much superglue as needed (you can use epoxy too). Give the glue time to dry.

Step 4

Prepare the body repair paste. For Bondo and similar products, the end result should be a substance that’s thick but can be spread. Do not work in large amounts as they’ll harden too quickly. Put the mixture in the cracks and fissures. Try to make it as even as possible.

Step 5

Sand the area, going from rough to fine grit. Remove any dust and debris. After you fix aluminum patio furniture, you can add as many coatings as you want.

How to Paint Aluminum Patio Furniture

Required Tools and materials

Big brush
Rustproof paint
Rust remover
Mild detergent
Spray paint
Water

Step 1

Before you paint the furniture, take off the cushions and other accessories on it. Set the furniture in an area where paint won’t damage other items. If necessary, put plastic coverings on the floor.

Step 2

Dip the sponge in the detergent. Wash the aluminum furniture. Take out the loose paint and other broken parts. Scrape off the rough parts and make the surface as smooth as possible.

Step 3

Use the rust remover to eliminate the rust. Repeat this process as often as necessary. Soak the sponge in the mild detergent. Clean the furniture again.

Step 4

To fix aluminum patio furniture, start painting. If the furniture is small, use the spray paint instead. If painting chairs and tables, use the large brushes.

Step 5

Allow the paint to dry before putting on a second coat. This is particular important if the color foundation is dark. You’ll also need to use a large brush if you had to remove lots of paint. Allow the furniture to dry.

Tips and Warnings

Put on a face mask when you are painting. Do not take off your gloves during the process so no paint gets on your hands. When painting, the aluminum patio furniture should be kept away from rain. If the damage is extensive, have it repaired by a qualified repairman.

By knowing how to fix aluminum patio furniture, you’ll be able to preserve them. Well maintained, the patio furniture should make your surroundings more attractive.

How To Build A Garden Bench

Thursday, December 17th, 2009

With a few tools and some lumber, you’ll be able Build A Garden Benchto build a garden bench on your own. If you want to make a bench using different dimensions from the ones specified here, just make the lumber cuts bigger.

How to Create a Backless Garden Bench

Required Tools and Materials

Six 8′ 1” X 4” boards
Three 8′ 1"x1" boards
Saw
Drill
Hammer
Paint
A box of screws
Screwdriver

Step 1: Make the Top of the Bench

Saw the 8′ 1"x4" so you get five pieces each 44”long. For the frame boards, saw the 8′ 1"x1" so you have a couple of 40" long 1"x1" and 22" long 1"X1" boards. Screw them to make the frame.

Step 2: Add the Supports

To build a garden bench, you need to cut a couple of 1"x1" boards 20” long. Put them in the frame and screw.

Step 3: Screw the Top Deck

Fasten the top deck so there’s a gap of .75” each. You’ll have a bench 22” wide.

Step 4: Create the Base

Saw one 1"x4" (40 ft long) board and two 22” 1"x4". Screw the 44” on the sides of the 22”. Use two screws for both ends.

Step 5: Make the Bench Legs

Make four 17" 1"x4" boards. Mark the spots where the legs will be screwed to the base. To build a garden bench’s legs, you need to flip the board over. Drill four holes and screw the legs in. To attach the base to the deck, screw the legs in the frame.

Step 6: Paint the Bench

Paint it any color you like. Allow the paint to dry.

How to Create a Garden Bench (Method II)

Required Tools and Materials

2" x 6" x 8′ boards
1" x 2" x 8′ boards
Hammer
Nails
Saw

Step 1: Determine the Size of the Bench

Common lengths are 4 ft and 6 ft. Get the 2 x 6s and saw them according to the desired length. The average width is 18 to 20 inches. You can use these dimensions or you can build a garden bench that’s wider.

Step 2: Create the Bench Legs

Shape the four legs from the 2 x 6s. The typical bench leg height is 17 inches. Nail each one on the boards you cut. The legs need to be put near the edge. If the bench is six feet or longer, you’ll need to create bench legs for the middle portion of the bench too. Get the 1" x 2" x 8′ boards.

Place them along the external edges of he bench. Fasten them on. Get some of the 1 x 2s and slice them into strips. Fit them in the edging. Space each strip by 2 inches.

Step 3: Paint or Stain

Hardwood is more suitable for staining than painting. Give the paint as much time as needed to dry.

After you build a garden bench, you can try other styles. With the experience you gained, you can try making other benches with confidence.