There are several types of floating floors available, but the installation process is basically the same. What you must remember when you install a floating floor is precise measurements are a must.
Required Tools and Materials
Molding
Threshold
Pry bar
Jigsaw
Painter’s tape
Hammer
Wood block
Spacers
Glue
Flooring
Duct tape
Utility knife
Underlayment
Dovetail saw
Measuring tape
Vacuum
Start by measuring the rooms. Include the closet in your measurements. Purchase 20% more flooring than needed.
Step 2
Use the dovetail saw to trim the door casings. Determine the amount that has to be trimmed. You can do this by putting the floor plank and underlayment adjacent to the door frame. Mark the cut spot.
Step 3
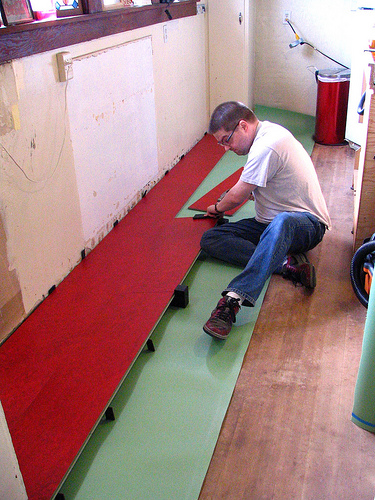
Next you have to vacuum the room. Roll the foam underlayment. You
must put only one layer of this on the floor. Use the utility knife to trim the foam as needed. Apply some duct tape to cover the seams. Set the planks down. When you install a floating floor, make sure there are sufficient planks.
Step 4
Put the spacers by the starting wall. This is needed because the floors will expand during warm weather and contract during the cold season. Position the first plank at a corner. This should be set against the spacer. The cut ends should be against the wall. The tongues should always face out.
Step 5
Add more planks to complete the first row. When you get to the last plank, put a spacer next to the wall. Measure this to the final plank to be set in the first row. Note the measurement. Cut the next plank to this size. Put the last plank in. Connect the pieces with the pry bar.
Step 6
Put the other floor pieces in place. Use the same method as described earlier. Put glue on each groove. Slide on the preceding row. Put the wood block on the plank outside. Hit it lightly with a hammer.
Step 7
Set the painter’s tape per 4 rows.
Step 8
Determine the width for the final planks. If the plank runs across a door, it must be made to accommodate the doorway. Set this to the doorstep edge.
Step 9
Arrange the final pieces on the last row. Use the pry bar if needed.
The final step to install a floating floor is to let the glue cure for a dozen hours. When it is dry, take off the spacers. Now you can put in the threshold, perimeter molding and transition. The floor is finished.